Showing posts with label Noteworthy. Show all posts

Monday, November 06, 2006

Monochromatic Monday

Monochromatic colors are all the hues of one color. For scrapbooking the warms colors look great with sepia tones and the cool colors look great with cool tones. I will use this effect on my pages mostly when I have great embellishments that I love on the page, but they seem to overpower the pictures. Using monochromatic tones reduces their power. It could also be used to create a peaceful effect. Here are some of my projects using a green monochromatic color scheme.

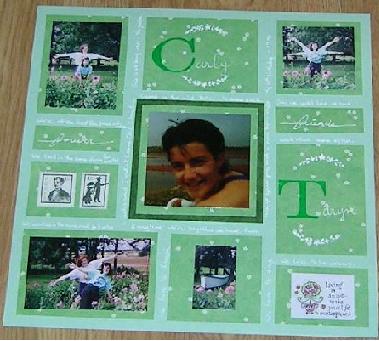
This was another page done during the last VSBN. It was done for the Ireland challenge, which was to complete a layout in monochromatic green while following the sketch.
Journaling reads: Carly and I met at Canoe Cove Christian Camp in the mid '80s. We saw each other only once a year but wrote often. Once we could drive we saw each other more often. Throughout time we often lived far from each other. But we lived in the same dorm for 6 months. We worked in the same mall for 6 months. We love to laugh. We love to sing. We love to be crazy. This is us being crazy in the garden. My 16th birthday Aug 27,1991. Stamps: Noteworthy Paper: $ store patterned paper, green cardstock Ink: Whisper White, White Souffle pen Accessories: Vintage clip art, sticker quote, Monogram Rub ons Techniques: blocking

I made this cardset for the craft fair. There is 2 of each design. I used Reverse Prints (now retired) and Noteworthy (also retired). I also made a notebook with matching pen. I’m still not sure if I will sell together or separately so people have the option to mix and match. All papers were from my miscellaneous paper pile so I am not aware of the manufacturer I used Glorious Green Ink.
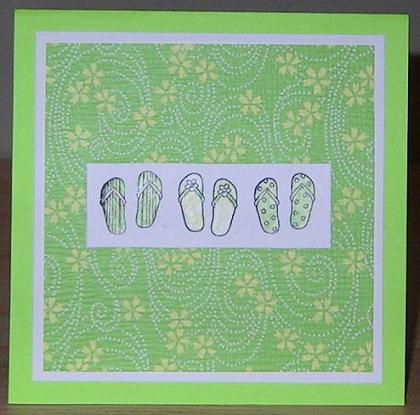


This is a 4 ½ x 4 ½ card The stamp is Katie&co. and the papers were again from my miscellaneous paper pile. I used Jet Black Staze on ink.

The color is off in these cards. They are more green than they seem. I used the poinsetta image from Happiest of Holidays. I used Old Olive ink and a black Zig pen for faux stitching.

Sunday, November 05, 2006

Scrapbook Sunday - This month I decided to not go with a particular scrapbooking theme but to instead show some of my favorite pages from this past Virtual Scrapbook Night. The even occurs every three months on www.splitcoaststampers.com. The normal routine is that there is a preview, which is an evening of challenges (3 because each lasts 2 hrs) for those who are new so they can get a taste of the big event. Then there is a weekend when a new challenge is posted every 2 hours. It is very challenging for people like me who spend days on one page. You do not have to do each challenge but can it you want. It’s so fun to get a lot done. The October event was the sites third VSBN.
I saw a similar layout on someone’s blog (unfortunately I can’t remember which one) and modified it to fit a 12x12 page. I made this for the Italy challenge, which was to use the color of wine and some heat embossing on the page. I embossed the title and the smaller words to each side.

Journaling reads: We went to the old playground in the National Park. It was very windy but Lavinia did not want to leave the slide. She didn’t even want to walk the trails. She loved that slide. Cavendish Sept 2006

Papers: Costco generic Stamps: LetterPress Alphabet, Noteworthy Ink: Perfect Plum

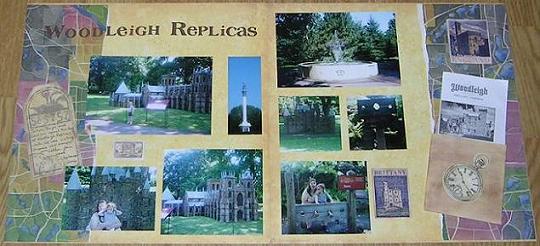
I did this layout for the France challenge. which was to use brown to complete a vintage look to your layout. Also embellish well. I normally love metal and ribbons; I left it out on this layout. There was a bonus for sepia tones, which I did not do. Journaling reads: Jason, Taryn, and Lavinia spent the day at Woodleigh Replicas while visiting Grammie and Grampie MacLellan for a week. September 2006

Paper: Simply Scrappin' Vintage papers and stickers, $ store patterned paper Ink: Basic Brown for aging Accessories: Basic Grey Urban Couture alphabet stickers, vintage clip art, library pocket.

I did this layout for the Scotland challenge, which was to use plaid in your layout.
Journaling reads: When I was little both Philip and Tanya’s friends called me “Little Philip”. That always made me feel so proud. Philip was the smart one who always excelled in school. My grades were never that good. After pursuing a PhD in Economics he made a decision to start a different career path. He then went to school to become a teacher. He practice taught in my high school and I loved spending time with him.
I loved to follow Tanya around everywhere. Sometimes she would do my hair. Later she became a hairdresser and she continued to do my hair for years. She was in 4-H and I remember her being very good at cooking and crafts, which I could never do. She did introduce me to scrapbooking, which later became my obsession. Stamps: Letterpress Alphabet Paper: Real Red, Paper Pizzazz Christmas plaid paper, white cardstock Ink: Read Red, White Souffle pen

The next Virtual Scrapbook Night (should really be weekend) should be January. Close to that time we will see threads in the forums with the dates and a shopping list of what you would need on hand for each challenge in the event.

Saturday, November 04, 2006

Stamp Set Saturday

Stampin’ Ups Fun Filled stamp set is my latest acquisition. It is one that didn’t impress me when I first looked at it but once I started using it, it is one of the sets that I reach for most often. It is just so versatile. I love the background swirl. It’s good for any kind of card. The whole set is so versatile. Here’s some cards and projects I’ve used with this set.

For the craft fair I did some gift sets and mini gift sets. I really love coffee so I did one of each kind with a coffee theme. Here is a mini gift set. It has a mini notebook, matching pen, 4 3x3 gift cards and a mini post-it-note holder. The coffee mug was made with a 2 step basket/purse stamp. This means there is one stamp to stamp the outline of the basket/purse stamp, then I stamp again to fill it in. Actually I would do the fill first and then the outlining but it is easier to explain the steps backwards without having a visual. I used the swirl stamp for the background. All papers came from my miscellaneous scraps so they are a variety of brands. I used Chocolate Chip and Elegant Eggplant ink.

Here is a regular gift set with 2 cards instead of 4 gift tags. I used Basic Brown ink for the background swirls and used Pixie Pink and Pink Passion for the image. The sentiment reads, “I’d rather be shopping”.

Not only does the stamp set make different kinds of cards but it can also be used with other stamps for even more versatility. Here is another gift set (can you tell I’m getting ready for a craft fair?) using just the background swirls of Fun Filled. I got the main image is Katie & co. and used the Linen background stamp and “baby” from Noteworthy on the panels. My last gift set used the background swirl from Fun Filled as well.

The snoopy stamp is by Stampabilities. Fun Filled is such a great set to use. The 2 step stamp make it easy to do cards fast. You do not have to color the image but also have the option to do so if desired. The background swirls add interest to the whole card, not just the focal point. There is also a flower image and a bow to go on top of the basket/purse 2 step stamp. The stamp set definitely surpasses my expectations.